Introduction
How To Use Balloon Tying Tool – Balloons have long been synonymous with joy, celebration, and festivity. From birthday parties and weddings to corporate events and grand openings, these vibrant inflatable objects never fail to captivate and entertain. While balloon decorations have evolved over time, one aspect remains constant: the need for efficient and precise balloon tying. Enter the balloon tying tool—a game-changing device designed to streamline the process and unlock a world of creative possibilities.
In this guide, we will delve into the art of balloon tying and explore how to make the most of this indispensable tool. Whether you are a professional balloon artist or simply a DIY enthusiast looking to add a touch of magic to your events, mastering the use of a balloon tying tool will empower you to create stunning balloon displays with ease and precision.
Gone are the days of sore fingers and struggling to tie balloons manually. The balloon tying tool offers a revolutionary solution, simplifying the process and significantly reducing the time and effort required. This device typically consists of a sturdy base, a balloon holder, and a built-in mechanism for securely fastening the knot. With its user-friendly design, the tool accommodates balloons of various sizes, allowing for versatile applications and designs.
The advantages of using a balloon tying tool extend beyond convenience. Its ergonomic design ensures a comfortable grip, minimizing hand fatigue during extended balloon tying sessions. Additionally, the tool’s consistent knotting technique guarantees that balloons remain inflated for longer durations, making them ideal for events that span hours or even days.
Beyond practicality, the balloon tying tool enables aspiring balloon artists to unleash their creativity. With this tool in hand, you can explore intricate designs, experiment with different balloon shapes and sizes, and create awe-inspiring decorations that leave a lasting impression. From classic balloon arches and columns to whimsical animal sculptures and themed centerpieces, the possibilities are limited only by your imagination.
Throughout this guide, we will walk you through the essential steps for using a balloon tying tool effectively. We will cover the proper setup and assembly, provide detailed instructions on tying balloons of different types, and share valuable tips and tricks for achieving professional-looking results. Get ready to elevate your balloon artistry and transform any space into a visually enchanting wonderland.
Do balloon tying tools work?
The balloon tying tool is easily the best invention in party decorating since the electric balloon pump. The balloon tying tool makes tying balloons easier and painless for your precious fingers. And it is seriously easy to use too!
Yes, balloon tying tools are effective and efficient devices that simplify the process of tying balloons. These tools are designed to securely hold the neck of a balloon, allowing for easy and quick knotting.
Balloon tying tools typically consist of a sturdy base with a clamp or holder to secure the balloon. They may also include features such as a built-in cutter to trim excess balloon length. To use these tools, you insert the balloon neck into the clamp or holder, and then twist or pull the balloon to create a knot.
The primary advantage of balloon tying tools is their ability to save time and effort. They eliminate the need for manual knotting, which can be tedious and time-consuming, especially when dealing with a large number of balloons. These tools enable balloon artists, decorators, and event organizers to tie balloons more efficiently, allowing them to focus on other tasks.
Furthermore, balloon tying tools offer consistent and secure knotting, reducing the risk of balloons coming untied and deflating prematurely. They also provide a more comfortable grip, which is beneficial for individuals who struggle with manual dexterity or have limited hand strength.
How do you use an easy balloon tie?
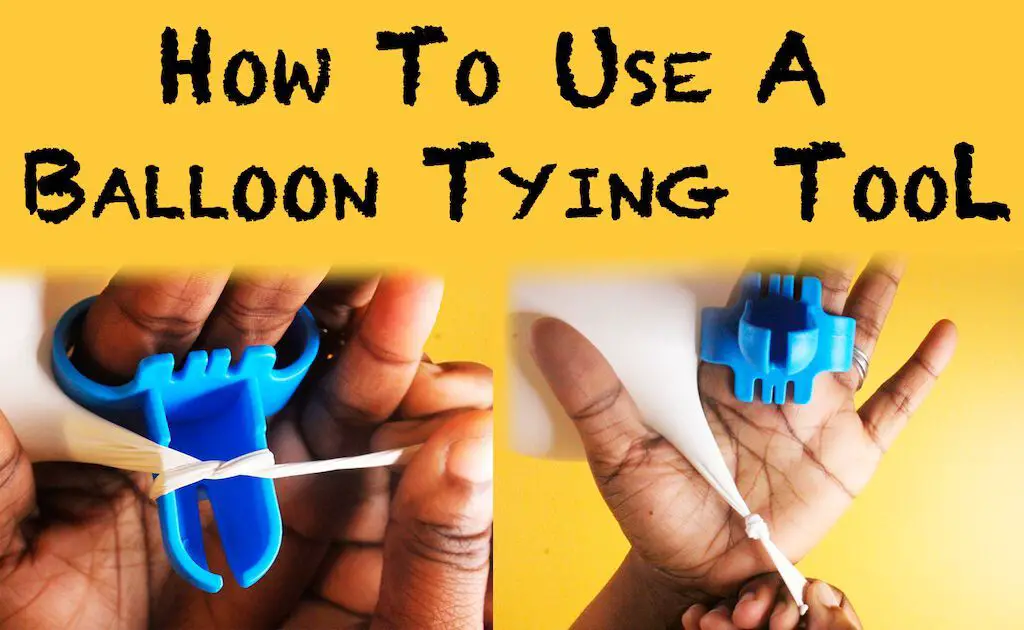
How to use a balloon tier
Step 1 – Inflate your balloon.
Step 2 – Put the Balloon tie tool on your less dominant hand.
Step 3 – Put the balloon between your thumb and index finger.
Step 4 – Stretch the mouth of the balloon.
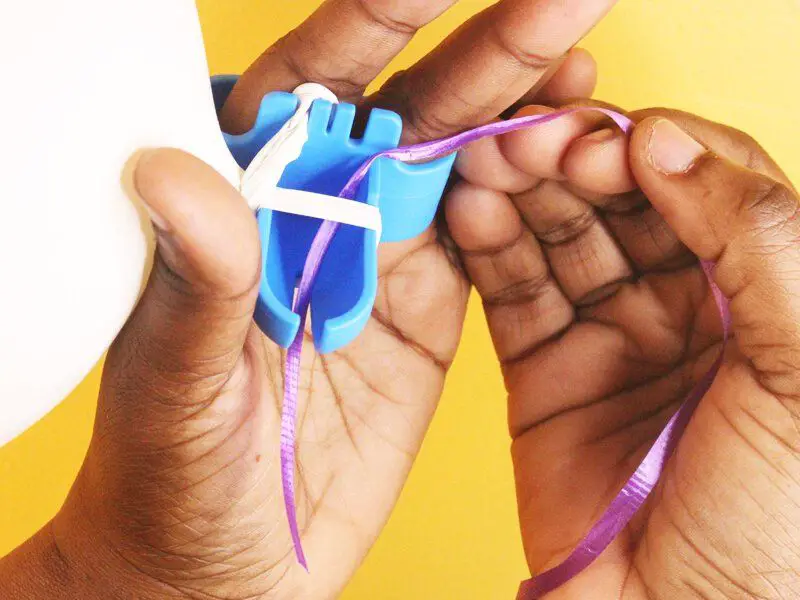
Step 5 – Wrap the balloon neck around the tie tool.
Step 6 – Make a Knot around the tie tool.
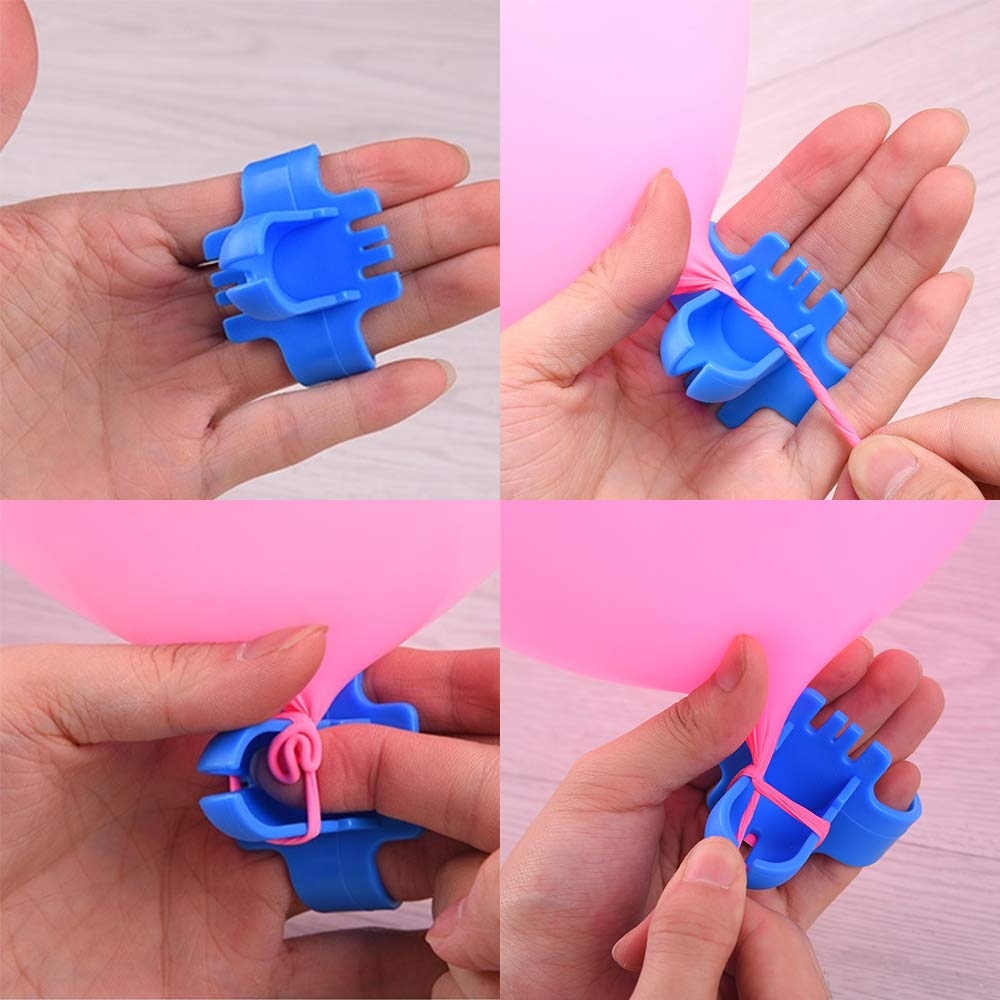
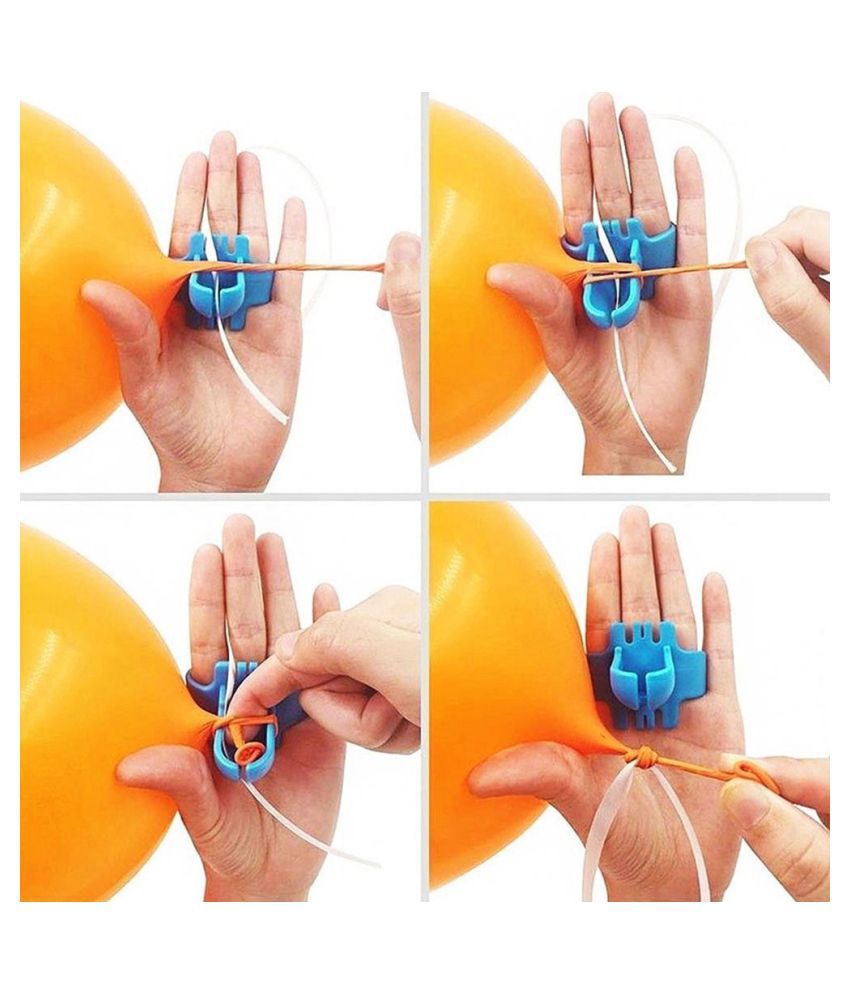
Using an easy balloon tie is a straightforward process that simplifies the task of tying balloons.
Here’s a step-by-step guide on how to use an easy balloon tie:
Prepare the balloon: Inflate the balloon to the desired size, leaving a tail of about 4-6 inches (10-15 cm) at the end.
Insert the balloon tail: Take the tail of the balloon and insert it into the slot or opening of the easy balloon tie tool. Make sure the tail goes all the way through the slot.
Twist the balloon: Hold the tail of the balloon and twist it a few times to create a secure closure. This will prevent air from escaping.
Secure the balloon: With the tail twisted, pull it down and tuck it under the hooks or clips of the easy balloon tie tool. Ensure that the tail is held firmly by the hooks or clips.
Trim excess tail (if applicable): If the easy balloon tie tool has a built-in cutter, use it to trim the excess tail of the balloon. Cut it close to the tool for a neat finish.
Release the balloon: Once the balloon is securely tied, gently release it from the easy balloon tie tool by loosening the hooks or clips.
Using an easy balloon tie significantly speeds up the process of tying balloons, especially when dealing with a large number of balloons. It provides a reliable and consistent closure, saving time and effort for balloon artists, decorators, and event organizers.
What tool do you use to tight balloons?
Use Balloon Tie Tool to knot balloons tight in a breeze. This blue, plastic handheld tool is designed to make your party planning less painful and more efficient. It is designed with a slit and a bowl shape so you can easily roll the knot over the tool rather than squeezing it around your fingers.
To tie balloons, you can use various tools depending on your preference and the specific task at hand. Here are a few commonly used tools:
Balloon Tying Tool: Balloon tying tools are specifically designed to simplify the process of tying balloons. These tools typically have a clamp or holder to secure the balloon neck, allowing for easy and quick knotting. They may also feature a built-in cutter to trim excess balloon length.
Balloon Pumps: Balloon pumps are handheld devices that help inflate balloons quickly and efficiently. While their primary purpose is to inflate balloons, many balloon pumps also have a nozzle or attachment that can assist with tying the balloons. These attachments can hold the balloon neck securely, making it easier to tie knots.
Manual Knotting Techniques: Although not a tool per se, manual knotting techniques involve using your hands to tie balloons. This method requires holding the balloon neck firmly and manually creating a knot by twisting and looping the balloon. While it may take more time and effort, it remains a common approach, especially for small-scale balloon tasks or when tools are not readily available.
The choice of tool depends on factors such as the volume of balloons you need to tie, your personal preference, and the level of convenience and efficiency desired. Balloon tying tools and balloon pumps are especially beneficial when working with a large number of balloons, as they can save time and provide consistent results.
What is a balloon nozzle?
These balloon nozzles allow you to easily fill your balloons. Just attach it to your Helium tank, and use the valve to realease helium into the balloon. Then turn it off, remove the balloon and tie it closed, and your ready for the next one!
A balloon nozzle is a device or attachment used in conjunction with a balloon pump to inflate balloons. It serves as the interface between the pump and the balloon, allowing for efficient and controlled airflow during inflation.
A balloon nozzle is typically made of plastic and is designed to fit securely onto the end of the balloon pump. It features a small opening or tube through which the air flows into the balloon. The nozzle is specifically shaped to provide a tight seal around the balloon neck, preventing air from escaping during inflation.
The primary purpose of a balloon nozzle is to streamline the process of inflating balloons. By attaching the nozzle to the pump, you can easily insert the balloon neck into the opening of the nozzle. The nozzle holds the balloon securely in place while allowing a smooth flow of air to enter the balloon.
Balloon nozzles come in various sizes to accommodate different balloon types and diameters. Some nozzles have additional features, such as a valve or a sealing mechanism, to ensure a secure and airtight connection with the balloon.
Using a balloon nozzle offers several advantages, including faster and more controlled inflation, reduced effort and strain on the hands, and a more consistent inflation process. It is an essential tool for balloon artists, decorators, and anyone who frequently works with balloons and requires efficient and reliable inflation.
Can I make a balloon arch 2 days before?
Air-inflated garlands will last days – if not weeks – so it is perfectly fine to inflate your balloons and build your garland the day or night before your celebration. This will help eliminate that pre-party panic we all experience the morning of the party!
Yes, it is possible to make a balloon arch two days before your desired event or occasion. Balloon arches can be made in advance to save time and ensure proper preparation. Here are a few key considerations to keep in mind:
Balloon quality: Choose high-quality balloons that are known for their longevity. Latex balloons, when properly inflated, can typically hold their shape for several days. It’s important to avoid under-inflating or over-inflating the balloons, as both can affect their lifespan.
Balloon treatment: To maximize the lifespan of your balloon arch, consider applying a product called “balloon shine” or “balloon sealant.” These substances create a thin protective layer on the surface of the balloons, helping to slow down the helium or air leakage.
Storage conditions: After constructing the balloon arch, it’s crucial to store it properly to maintain its integrity. Keep the arch in a cool and dry environment away from direct sunlight, extreme temperatures, sharp objects, and potential sources of friction. Using a plastic bag or covering can also help protect the arch from dust and debris.
Balloon maintenance: Check the balloon arch periodically to ensure that the balloons are holding up well. If you notice any deflation or drooping, you may need to add more air or helium as necessary.
By considering these factors and taking proper care, it is feasible to create a balloon arch two days before your event. This allows you to have ample time to focus on other event preparations while ensuring that your balloon arch remains visually appealing and adds a festive touch to your occasion.
How does a balloon tying tool simplify the process of tying balloons?
A balloon tying tool significantly simplifies the process of tying balloons by providing several key benefits and efficiencies:
Time-saving: Tying balloons manually can be a time-consuming task, especially when dealing with a large number of balloons. A balloon tying tool streamlines this process by securely holding the balloon neck, allowing for quick and efficient knotting. It eliminates the need for manually gripping and twisting the balloon, resulting in considerable time savings.
Consistency: Balloon tying tools provide a consistent and secure closure for balloons. They ensure that the knot is tight and properly sealed, reducing the risk of balloons coming untied and deflating prematurely. This is particularly important for events or decorations where balloons need to maintain their appearance and stay inflated for an extended period.
Ease of use: Balloon tying tools are designed to be user-friendly and accessible to individuals of varying skill levels. They typically feature intuitive mechanisms or clamps that securely hold the balloon neck in place, requiring minimal effort and dexterity to operate. This makes them suitable for balloon artists, event organizers, decorators, or anyone working with balloons.
Reduced hand strain: Tying balloons manually can strain the hands and fingers, especially when tying a large number of balloons. Balloon tying tools offer a more comfortable grip, reducing hand fatigue and potential discomfort. This makes them particularly helpful for individuals with limited hand strength or dexterity.
What are the advantages of using a balloon tying tool compared to manual tying?
Using a balloon tying tool offers several advantages over manual tying methods, providing efficiency, convenience, and improved results.
Here are the key benefits of using a balloon tying tool compared to manual tying:
Time-saving: Balloon tying tools significantly speed up the process of tying balloons, especially when dealing with a large quantity. These tools securely hold the balloon neck, allowing for quick and easy knotting. This saves considerable time and effort compared to manually gripping and twisting each balloon individually.
Consistency: Balloon tying tools provide a consistent and secure closure for balloons. They ensure that the knot is tight and properly sealed, reducing the risk of balloons coming untied and deflating prematurely. This consistency is essential for events or decorations where balloon longevity and appearance are important.
Ease of use: Balloon tying tools are designed to be user-friendly and accessible. They typically feature intuitive mechanisms or clamps that securely hold the balloon neck, requiring minimal effort and dexterity. This makes them suitable for both experienced balloon artists and individuals with limited experience or manual dexterity.
Reduced hand strain: Manual balloon tying can strain the hands and fingers, especially when tying a large number of balloons. Balloon tying tools offer a more comfortable grip, reducing hand fatigue and potential discomfort. This is particularly beneficial for extended balloon decorating sessions or individuals with hand-related limitations.
Efficiency in high-volume settings: In situations where a significant number of balloons need to be tied, such as large events or balloon decorations, using a tying tool becomes even more advantageous. The tool’s speed and ease of use allow for a faster and more efficient workflow, improving productivity and reducing overall labor time.

Can a balloon tying tool accommodate balloons of different sizes and shapes?
Yes, a balloon tying tool is designed to accommodate balloons of different sizes and shapes. These tools are typically adjustable or versatile enough to securely hold various balloon neck sizes and shapes, providing flexibility and convenience in balloon tying.
Most balloon tying tools feature a clamp or holder mechanism that can be adjusted to accommodate different balloon neck sizes. The clamp can be tightened or loosened to ensure a secure grip on the balloon neck, regardless of its diameter. This allows for the efficient tying of balloons of various sizes, from small to large.
Furthermore, balloon tying tools are generally compatible with different balloon shapes, including round, latex balloons, as well as specialty shapes like hearts, stars, or animal balloons. The tool’s design typically allows for easy insertion and holding of the balloon neck, regardless of its shape.
However, it is important to note that the specific capabilities of a balloon tying tool may vary depending on the brand and model. It is advisable to check the product specifications or instructions to ensure that the tool can accommodate the range of balloon sizes and shapes you intend to work with.
Are there any specific tips or techniques for achieving professional-looking balloon decorations using a tying tool?
Yes, here are some specific tips and techniques for achieving professional-looking balloon decorations using a tying tool:
Balloon arrangement: Plan your balloon arrangement in advance. Determine the desired shape, size, and color scheme of your decoration. This will help you ensure a cohesive and visually appealing design.
Balloon sizing: Use balloons of consistent sizes to maintain a uniform look. Consider using a balloon sizer tool to ensure balloons are inflated to the same size for a more polished appearance.
Balloon color combinations: Experiment with different color combinations to create visual interest. Mixing complementary or contrasting colors can make your decorations more vibrant and eye-catching.
Balloon placement: Start by tying the balloons onto a line or frame, securing them with the balloon tying tool. Pay attention to spacing and arrangement to achieve a balanced and symmetrical display. Use varying balloon heights for added dimension.
Balloon garlands: Create balloon garlands by tying multiple balloons together in a series. Use the tying tool to efficiently secure the balloons in place. Incorporate different balloon sizes and colors for an attractive and textured look.
Balloon centerpieces: For balloon centerpieces, tie clusters of balloons together using the tying tool. Vary the heights and sizes of the balloons to add visual interest. Consider adding decorative elements, such as ribbons or tulle, to enhance the centerpiece.
Attention to detail: After tying the balloons, check for any loose or uneven knots and make necessary adjustments. Trim any excess balloon tails for a clean and polished finish.
Experiment and practice: Explore different techniques, such as using different balloon sizes or incorporating foil balloons or balloon shapes. Practice and experiment with various designs to enhance your skills and create unique and professional-looking balloon decorations.
By following these tips and techniques and incorporating your own creativity, you can achieve stunning and professional-looking balloon decorations using a tying tool.
What are some common mistakes to avoid when using a balloon tying tool?
When using a balloon tying tool, it’s important to be aware of common mistakes and take precautions to ensure successful balloon tying.
Here are some common mistakes to avoid:
Improper balloon inflation: Avoid over-inflating or under-inflating balloons. Over-inflated balloons are more likely to pop, while under-inflated balloons may not hold their shape properly or securely fit in the tying tool.
Insufficient grip on the balloon neck: Ensure that the balloon neck is securely held by the tying tool. If the grip is too loose, the balloon may slip out or come untied. Conversely, if the grip is too tight, it may damage or puncture the balloon.
Incorrect positioning of the balloon neck: Properly position the balloon neck within the tying tool to ensure a secure and tight knot. If the balloon neck is not inserted far enough or aligned properly, it may result in a loose or unstable knot.
Neglecting to trim excess balloon tail: After tying the balloon, trim any excess balloon tail using a cutter or scissors. Neglecting to do so can affect the aesthetic appearance of the balloon decoration.
Using worn-out or damaged tying tools: Regularly inspect your tying tool for any signs of wear or damage. A damaged tool may not provide a secure grip or proper functionality, leading to ineffective balloon tying.
Ignoring storage and environmental factors: Properly store your tying tool in a clean and dry location to maintain its functionality. Additionally, consider environmental factors such as temperature and humidity, as extreme conditions can affect the performance of balloons and the tying tool.
By avoiding these common mistakes and taking care in the balloon tying process, you can ensure successful and professional-looking results with your balloon tying tool.
Conclusion
The balloon tying tool is a game-changer for anyone involved in the art of balloon decorations. Its efficient and user-friendly design makes balloon tying a breeze, saving time and effort while ensuring precise and secure knots. With this tool in hand, you can elevate your balloon artistry to new heights, unleashing your creativity and creating breathtaking displays that leave a lasting impression on any occasion.
By following the steps outlined in this guide, you can master the use of a balloon tying tool effectively. From the initial setup and assembly to tying balloons of various types and sizes, you have learned the fundamental techniques needed to create stunning balloon arrangements. Remember to take advantage of the tool’s ergonomic design, which minimizes hand fatigue and allows for extended periods of balloon tying without discomfort.
Additionally, don’t be afraid to let your imagination run wild. The balloon tying tool opens up a world of creative possibilities, enabling you to experiment with different shapes, sizes, and designs. Whether you’re crafting elegant balloon arches for a wedding or whimsical animal sculptures for a children’s party, the tool provides the stability and consistency required to bring your vision to life.
Finally, practice and perseverance are key. Like any skill, mastering balloon tying with a tool requires time and dedication. With each attempt, you will refine your technique, gain confidence, and develop a keen eye for detail. Embrace the learning process and enjoy the journey as you continue to push the boundaries of your creativity.